Global filters
Productivity · Spreadsheet
Global filters
Global filters, accessed via the Filters icon at the top right of an Odoo spreadsheet or via the search bar of an Odoo dashboard, allow the simultaneous filtering of all the Odoo data connected to the spreadsheet or dashboard. This feature enables individual users to dynamically personalize their view to draw specific insights, without altering the base report or dashboard for others.
Unlike standard spreadsheet filters, which only act on visible data, global filters act on a spreadsheet’s underlying data source(s). They control which data is retrieved from the data source, essentially filtering the data before it is loaded. By using filter operators such as contains, is equal to, starts with, etc., users can refine the filtering for more precise results; the available operators depend on the type of filter.
During the configuration of a global filter, a field matching process ensures that the filter acts on, or matches against, the appropriate database fields.
Example
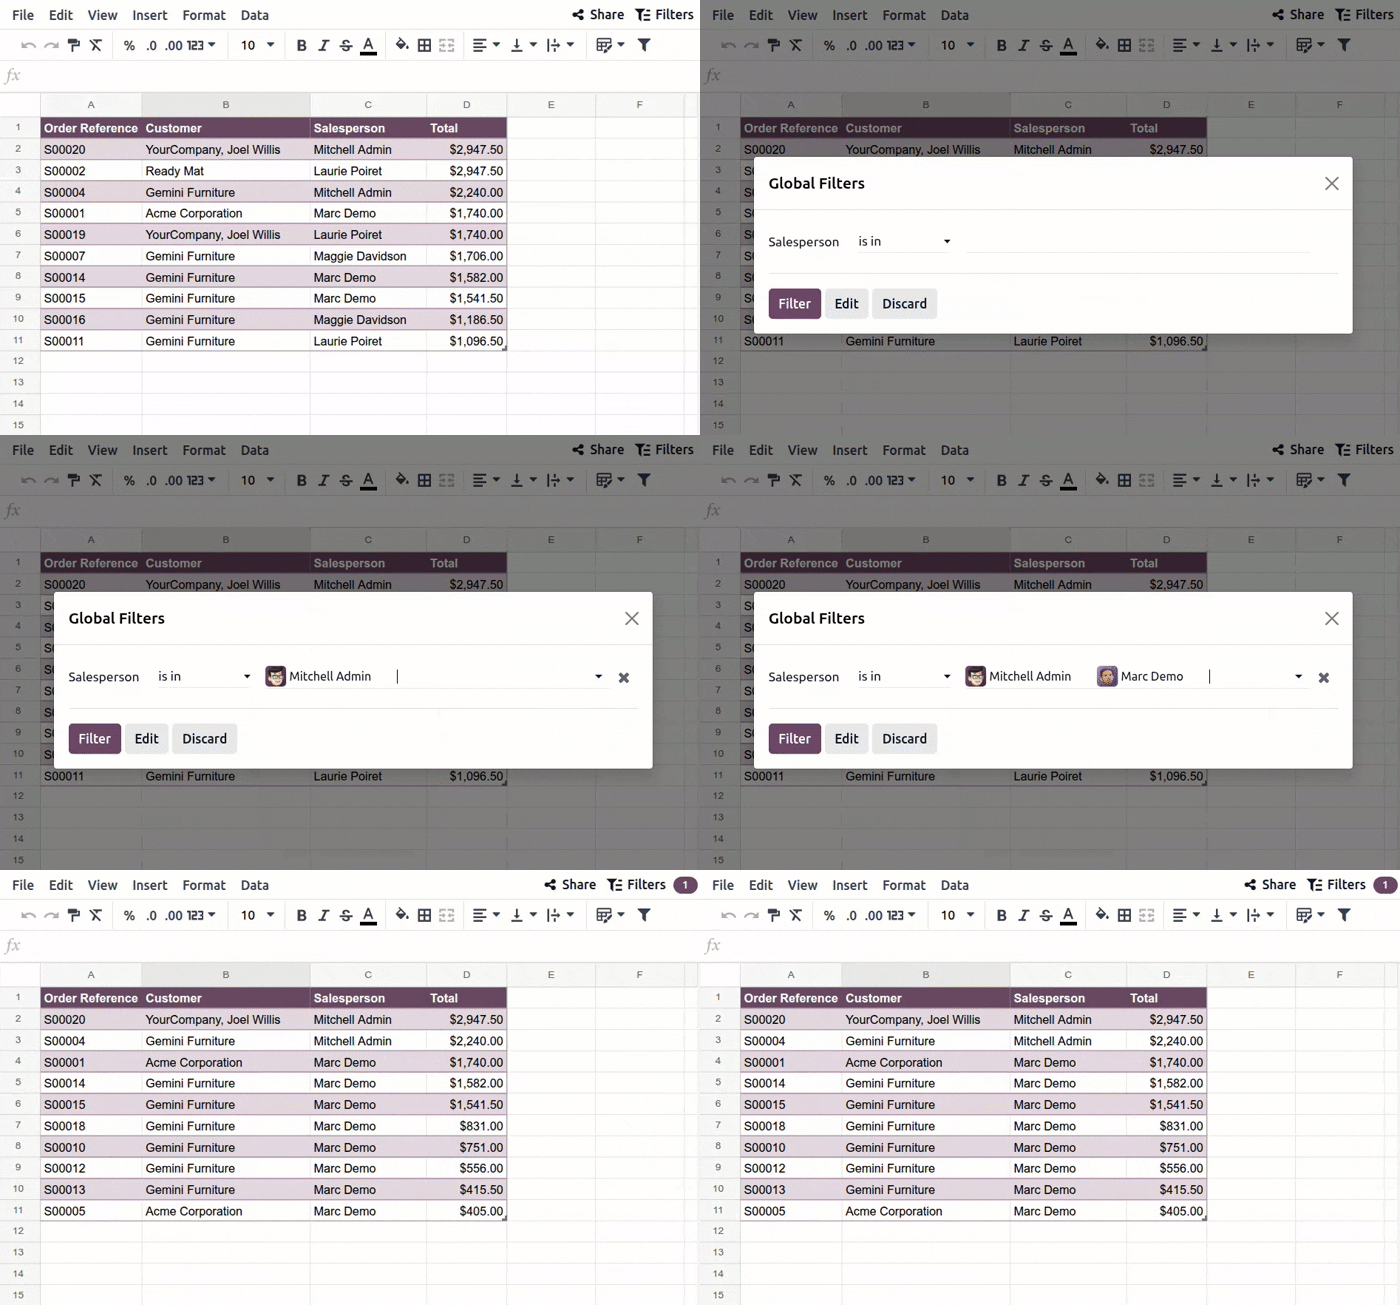
The example shows a list of the top ten sales orders across all salespeople. Applying a global
filter on the Salesperson field allows the user to see only records where the
salesperson is in the defined set of values, i.e., is Mitchell Admin or Marc
Demo.
Tip
Global filters work by temporarily adding extra conditions to the domains of the connected data sources. Therefore, if you intend to use global filters, do not use the same conditions when preparing the initial list, pivot table, or chart for insertion into a spreadsheet or dashboard.
Setting default filter values, where relevant, ensures that the spreadsheet or dashboard loads quickly and provides a useful initial view that can be further customized if needed. For example, a Date filter could be set to show data from the last 30 days by default, rather than showing all historical data.
Important
Only users with Editor rights to an Odoo spreadsheet can configure, manage, and apply global filters in that spreadsheet. Any user with access to an Odoo dashboard can apply global filters configured for that dashboard.
Configure global filters
To configure global filters in a spreadsheet:
Open the relevant spreadsheet from the Odoo Documents app or via the Odoo Dashboards app if you are configuring global filters for a dashboard.
Click Filters at the top right of the spreadsheet to open the Filters panel.
Tip
If at least one global filter has already been created for the spreadsheet, a Global Filters pop-up appears in the middle of the screen; click Edit to add or edit global filters.
In the Create filter section, select the relevant type of global filter.
In the Filter properties panel that opens, complete the relevant fields based on the type of global filter and ensure the Field matching section is correctly configured.
Note
Depending on the data source(s) connected to the spreadsheet, suggested global filters may be automatically proposed in the Suggestions section of the Filters panel. While these filters are pre-configured for immediate use, it is still possible to add a default value or restrict values using a domain.
If a default value is defined during configuration, the spreadsheet data updates immediately when the filter is saved.
Tip
Click (pin) at the top right of the Filters panel to allow another panel, such as the Filter properties panel, to open beside it.
Types of global filter
Six types of global filter are available:
Date: filters based on a specific or relative time range, e.g.,
January 2026orLast 7 Days.Relation: filters using a relational field in a related model, e.g., by Salesperson with the User model set as the related model.
Text: filters on a string of characters or a range of predefined values, e.g., a product reference or barcode.
Yes/No: filters based on whether or not a checkbox (boolean) field is checked, e.g., leads where the Active field is checked.
Selection: filters using the predefined options of a selection field, e.g., tasks where the priority level is set to
Urgent.Numeric: filters based on numerical values and ranges, e.g., purchase orders where the Untaxed Amount is above
$1,000.
Date
Note
A Date filter can only match against a Date or Date & Time field.
With the Filter properties panel open:
Enter a name for the new filter in the Label field.
To set a Default value, select one of the available values.
In the Field matching section, for each relevant data source, click beside Field, then select the field the filter should match against.
The Period offset option, which appears when a date field is chosen, enables comparisons to be made by shifting the time range by one or more periods in the past or future. By default, no period offset is defined. To define a period offset, select Previous or Next, then select the desired number of periods in the past or future.
Tip
To compare data effectively using the Period offset feature, duplicate the relevant inserted list or pivot table, then, when setting up field matching, set a period offset for the second data source but not the first.
When applying the filter, the original list or pivot table shows data for the time range selected, while the second shows data for a period before or after that time range, as defined.
Click Save.
Example
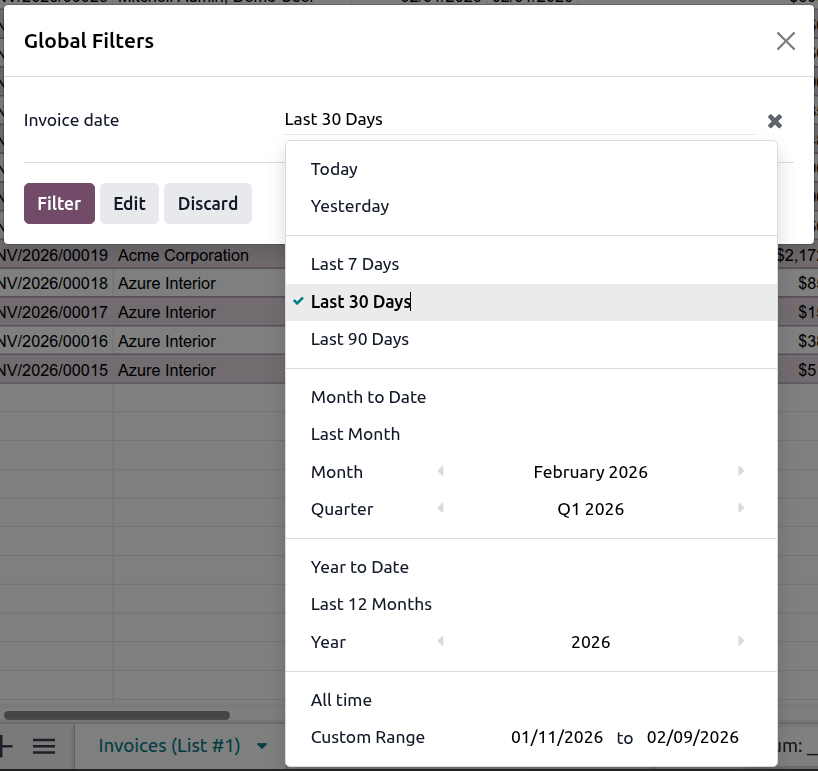
In the example, a Date global filter has been configured to filter data from the
Journal Entry model, with the Date field Invoice/Bill Date set as the matching
field. The user is opting to see all data for which the invoice/bill date falls within the Last
30 Days.
Relation
Note
A Relation filter can only match against a Many2One, One2Many, or Many2Many field.
With the Filter properties panel open:
Enter a name for the new filter in the Label field.
In the Related model field, start typing the model name to reveal a list of all models, then select the appropriate one. Once a model is selected, the Default value and Possible values fields appear, as well as the Field matching section.
To set a Default value, select one of the available values; these are records from the model. If the related model is the User model, the option Automatically filter on the current user can be enabled.
To limit the Possible values that can be shown, enable Restrict values with a domain, then click Edit domain to add or edit rules.
In the Field matching section, check if the correct matching field has been assigned for each relevant data source. If this is not the case, select the appropriate field.
Click Save.
Example
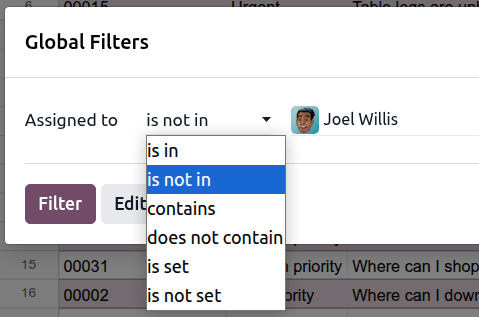
In the example, a Relation global filter has been configured to filter data from the
Helpdesk Ticket model, with the Many2One field Assigned to set as the matching
field. The user is opting to see all records where the assignee is not in the defined
set of users, i.e., is not Joel Willis.
Text
Note
A Text filter can only match against a Text (char), Integer, or Decimal (float) field.
With the Filter properties panel open:
Enter a name for the new filter in the Label field.
To set a Default value, type the value.
To limit the Possible values that can be shown, enable Restrict values to ranges, type or select a range from any sheet in the current spreadsheet, then click Confirm. Click Add range to define an additional range if needed.
In the Field matching section, for each relevant data source, click beside Field, then select the field the filter should match against.
Click Save.
Note
If Restrict values to range is:
enabled, and one or more ranges defined, a user can select the value of the text field from a dropdown when applying the filter.
not enabled, a user can enter multiple values when applying the filter.
Example
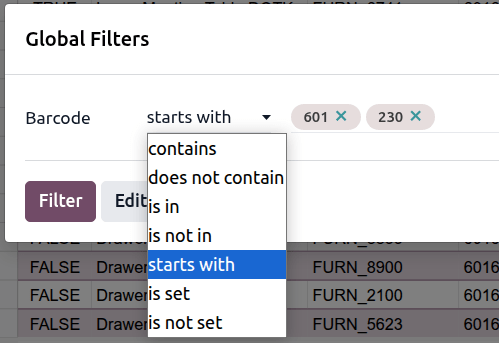
In the example, a Text global filter has been configured to filter data from the
Product Template model, with the Text field Barcode set as the matching field. The
user is opting to see all data where the product’s barcode starts with 601 or
230.
Yes/No
Note
A Yes/No filter can only match against a Checkbox (boolean) field.
With the Filter properties panel open:
Enter a name for the new filter in the Label field.
To set a Default value, select Is set or Is not set.
In the Field matching section, for each relevant data source, click beside Field, then select the field the filter should match against.
Click Save.
Example
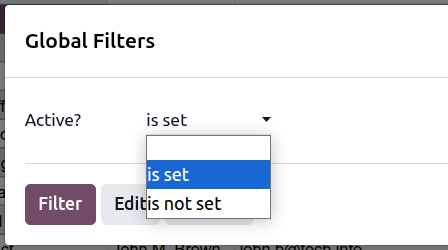
In the example, a Yes/No global filter has been configured to filter data from the Lead model, with the Checkbox field Active set as the matching field. The user wants to see all active opportunities, i.e., for which the Active checkbox is set, or enabled, on the record.
Selection
Note
A Selection filter can only match against a Selection field.
With the Filter properties panel open:
Enter a name for the new filter in the Label field.
In the Model field, start typing the model name to reveal a list of all models. Select the appropriate one, then, in Field, select the field the filter should match against.
To set a Default value, select a value from the dropdown.
In the Field matching section, for each relevant data source, click beside Field, then select the field the filter should match against.
Click Save.
Example
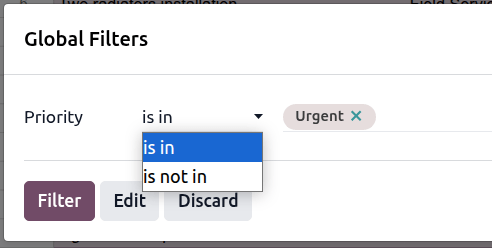
In this example, a Selection global filter has been configured to filter data from
the Task model, with the Selection field Priority set as the matching field. The
user is opting to see all data where the priority of the task is in the set of
defined values, i.e., has the priority Urgent.
Numeric
Note
A Numeric filter can only match against an Integer, Decimal (float), or Monetary field.
With the Filter properties panel open:
Enter a name for the new filter in the Label field.
In the Field matching section, for each relevant data source, click beside Field, then select the field the filter should match against.
Click Save.
Example
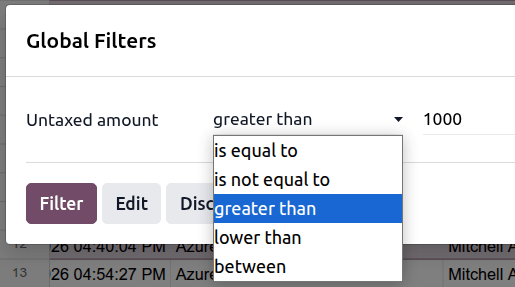
In the example, a Numeric global filter has been configured to filter data from the
Sales order model, with the Monetary field Untaxed Amount set as the matching
field. The user is opting to see all data where the untaxed amount is greater than
1000.
Field matching
Important
The field matching process is crucial, as matching the wrong fields or not setting matching fields at all, results in global filters that do not show the desired results.
To function as intended, a global filter needs to act on, or match against, the correct database fields. Consider a Date filter applied to sales data. As the Sales Order model contains several date fields, it is crucial to determine which field is relevant for the filter, e.g., the order date, the delivery date, the expected date, or the expiration date.
When configuring a global filter, the Field matching section of the Filter properties allows you to determine, for each data source in the spreadsheet, which database field the filter should match against.
Note
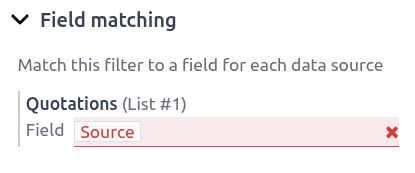
If a selected matching field is not one of the allowed field types for the type of global filter, the field name is shown in red on a red background to indicate an error. A global filter cannot be saved if a disallowed matching field is selected.
Manage global filters
To manage a spreadsheet’s global filters:
Open the relevant spreadsheet from the Odoo Documents app or via the Odoo Dashboards app if you are managing the global filters for a dashboard.
Click the Filters icon at the top right of the spreadsheet.
In the Global Filters pop-up window, click Edit.
Global filters that have been configured are presented as horizontal cards at the top of the panel. The icon before the filter name indicates the type of filter: (Date), (Relation), (Text), (Yes/No), (Selection), (Numeric).
The following actions are possible:
Change the order in which the global filters are displayed by clicking on a card and dragging it to the desired position.
Note
This order also determines how the filters appear in the Global Filters pop-up window in a spreadsheet or in the search bar in a dashboard when filters are being applied.
Edit a global filter by clicking on its card to open the filter’s Filter properties, then editing as needed.
Delete a global filter by clicking the icon on the relevant card. Alternatively, with a filter’s Filter properties panel open, click Remove to delete the global filter.
Apply global filters
To apply global filters in a spreadsheet:
Click the Filters icon at the top right of the spreadsheet. The Global Filters pop-up window displays the available global filters.
Note
If no global filters have been configured for the spreadsheet, the Filters panel opens on the right of the spreadsheet. It is then possible to create new global filters from scratch or add suggested global filters.
For the relevant global filter, select a conditional operator from the first dropdown, e.g., is equal to, then, as relevant, enter or select the appropriate value.
Click Filter.
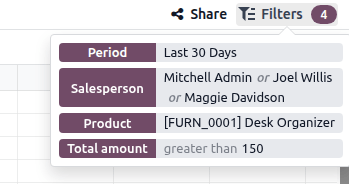
When one or more filters have been applied to a spreadsheet, the number of active filters is displayed beside the Filters icon at the top right of the spreadsheet. Hovering over this area reveals a list of the active filters with information about the filter values used.
Tip
Refreshing the browser causes any global filters to reset to their initial state or default value, as relevant. To refresh Odoo data in a spreadsheet without losing global filters that have been applied, click from the menu bar.
Adapted from the Odoo 19.0 User Documentation for DigitsCode customer support. © Odoo S.A. DigitsCode capabilities remain in the DigitsCode Capabilities category.