Replenish on order (MTO)
Supply Chain · Inventory
Replenish on order (MTO)
Replenish on order, also known as MTO (make to order), is a replenishment strategy that automatically triggers a purchase order (PO) or a manufacturing order (MO) for a product only when a sales order (SO) is confirmed.
For purchased products, Odoo creates an RfQ.
For manufactured products, it creates an MO.
The RfQ or MO is then linked to the source SO and accessible through a smart button, allowing users to directly trace the replenishment order back to the original customer demand.
Important
The RfQ or MO generated by MTO is designed to fulfill the source SO. This document should normally be confirmed or adjusted rather than canceled. If the RfQ or MO is canceled, Odoo does not automatically generate a replacement. A new replenishment document may be created manually, but it cannot be linked back to the original SO through the smart button. Instead, if the demand changes, update the document instead of canceling it.
Configuration
Enable the MTO route
In order to use the MTO route, the Replenish on Order (MTO) setting must be enabled. To do so, navigate to . Go to the Logistics section at the end of the page, and select the checkbox next to Replenish on Order (MTO). Click Save to confirm the setting.

Configure a product for MTO
With the MTO route enabled, products can now be configured to replenish on order. To do so, begin by going to . Then, select an existing product, or click New to configure a new product.
In the product form, go to the Inventory tab. Under the Operations section, select the checkbox next to the Replenish on Order (MTO) option in the Routes field.
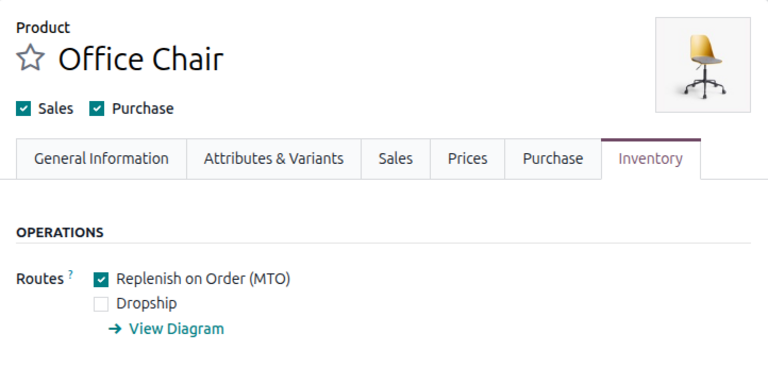
After enabling the MTO route, additional configurations should be made depending on whether the product is purchased or manufactured.
Note
As of Odoo 19.0, the Buy and Manufacture routes are hidden from the Routes field under the Operations tab by default. They are automatically applied on purchased and manufactured products depending on their respective configurations provided below in this section.
To manually enable these routes on product forms, navigate to and ensure that Multi-Step Routes is enabled. Then, navigate to and select the desired route. On the route page, click the checkbox next to Products under the Applicable On section.
For purchased products
If the product is purchased from a vendor to fulfill SOs, ensure the Purchase checkbox is enabled under the product name. This displays the Purchase tab below.
Then, click the Purchase tab and specify a Vendor and a Unit Price for the product.
Important
For purchased products, users must specify a vendor in order for Odoo to properly generate an RfQ.
For manufactured products
If the product is manufactured, ensure it has a bill of materials (BoM) configured. To do so, click the Bill of Materials smart button at the top of the form. Then, click New on the Bill of Materials page to configure a new BoM for the product.
Important
For manufactured products, users must specify a BoM in order for Odoo to properly generate an MO.
Replenishment workflow using MTO
After configuring a product to use the MTO route, a replenishment order is created whenever an SO including the product is confirmed. This replenishment order is either a PO if the product is purchased or an MO if manufactured.
Note
A replenishment order is always created upon confirming an SO, even if there is enough stock to fulfill the order.
Create a customer SO
To initiate a replenishment-on-order, navigate to the Sales app, then click New to open a new quotation form.
On the form, add a Customer. Then, click Add a product under the Order Lines tab, and enter a product configured for MTO. Click Confirm to turn the quotation into an SO.
Validate replenishment order
Upon confirming the SO, two smart buttons appear at the top of the form:
A Delivery order the user eventually validates when the product is ready to be delivered to the customer.
A Purchase order if the product on the SO is purchased or a Manufacturing order if manufactured.
For purchased products
If the product is purchased, a Purchase smart button appears at the top of the page. Click it to open the RfQ associated with the SO.
After verifying that the vendor can meet the demand by the Expected Date, click Confirm Order to turn the RfQ into a confirmed PO.
Once the products are received, click Receive to open the receipt, and click Validate to enter the products into inventory.
For manufactured products
If the product is manufactured, a Manufacturing smart button appears at the top of the page. Click it to open the MO associated with the SO. By default, the MO is confirmed immediately upon confirming the SO.
Continue by completing any work orders in the Work Orders tab. Then, click Produce All to mark the MO as done. The product is now registered into inventory.
Fulfill customer SO
Return to the SO via the breadcrumbs at the top, or by navigating to and selecting the SO.
Finally, click the Delivery smart button at the top of the order to open the delivery order. Once the products have been shipped to the customer, click Validate to confirm the delivery.
Cancel an MTO sales order
When an SO that had created an RfQ or MO is canceled, the related delivery order is canceled automatically. However, the RfQ or MO themselves are not canceled. Instead, a warning appears in their chatter noting the SO cancellation. These documents remain active, so the user can either cancel them manually or reuse the replenishment for another order.
See also
For information on workflows that include the MTO route, see the following documentation:
Adapted from the Odoo 19.0 User Documentation for DigitsCode customer support. © Odoo S.A. DigitsCode capabilities remain in the DigitsCode Capabilities category.