Storage categories
Supply Chain · Inventory
Storage categories
A storage category is used with putaway rules to assign a storage location to incoming products while accounting for the capacity of that location. Assigning categories to storage locations tells Odoo these locations meet specific requirements, such as temperature or accessibility. Odoo then evaluates these locations, based on defined capacity, and recommends the best one on the warehouse transfer form.
Follow these steps to complete the setup:
Assign a category to storage locations
Add the storage category as an attribute to a putaway rule
See also
Enable storage categories
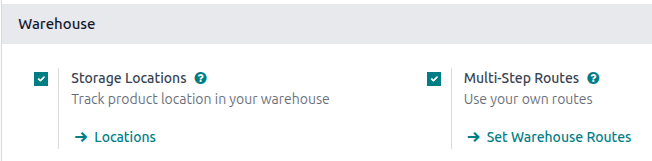
To enable storage categories, go to . Then, in the Warehouse section, ensure the Storage Locations and Multi-Step Routes features are enabled.
To set capacities by package type, also make sure Packages is enabled in the Operations section. Click Save.
Storage location setup
Set up storage locations to work with the storage category. A parent location must be set up, with child locations (or sublocations) assigned to it. This is because the putaway rule’s Store to location will be set to the parent location, and the storage category will be set to the child location.
Go to .
First, set up a parent location. This can be as simple as the default WH/Stock location.
Alternatively, create a new parent location by clicking the New button on the
Locations page. On this parent location form, specify a Location Name and
Parent Location. Select Internal as the Location Type.
Then, create sublocations of this parent location by clicking the New button. On the location form, specify a Location Name, and set the Parent Location to the parent location that was just created.
Example
A beverage company stores all of its cans of lemonade on pallets in one section of its warehouse.
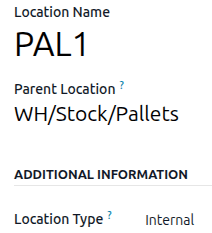
First, they create a location named Pallets in the WH/Stock location. Then, they create two
sublocations, named PAL1 and PAL2. Both have WH/Stock/Pallets set as the parent location.
Define storage category limitations
Before a storage category is applied to locations, it must be configured with specific limitations in order to decide the optimal storage location. Capacity can be limited by weight, product, and package type.
To create a storage category, go to , and click New.
On the storage category form, type a name for the category in the Storage Category field.
Note
Weight limits can be combined with capacity by package or product (e.g. a maximum of one hundred products with a total weight of two hundred kilograms).
While it is possible to limit capacity by product and package type at the same location, it may be more practical to store items in different amounts across various locations, as shown in the limit capacity by package example.
The Allow New Product field defines when the location is considered available to store a product:
If location is empty: a product can be added there only if the location is empty.
If products are the same: a product can be added there only if the same product is already there.
Allow mixed products: several different products can be stored in this location at the same time.
Important
Odoo does not automatically split quantities across multiple storage locations. If an incoming receipt contains several units or packages and the first recommended location exceeds its capacity, Odoo still routes all items to that same location instead of selecting another one with available space.
(Example: If a location can hold 10 units and 12 units arrive, all 12 are still assigned to that location.)
Limit capacity by weight
A maximum product weight can be set in the Max Weight field. This limit applies
to each location assigned this storage category. If a product weight is defined, the value must be
set to greater than 0.
Limit capacity by product
In the Capacity by Product tab, click Add a Line to enter a product, and set the maximum capacity that should be stored at each location in the Quantity field.
Example
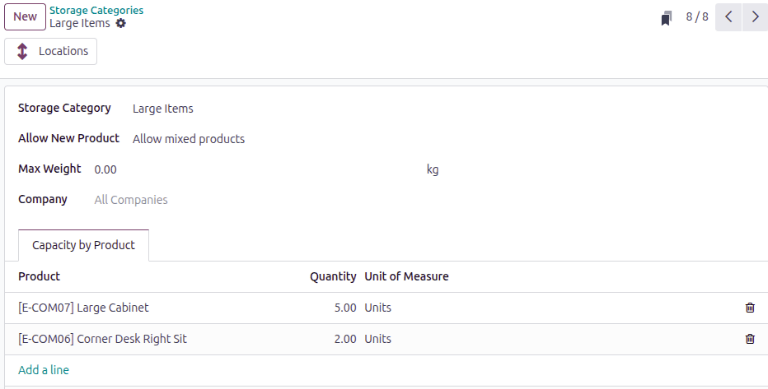
To ensure only a maximum of five Large Cabinets and two Corner Desk Right Sit are stored at a
single storage location, specify those amounts in the Capacity by Product tab.
Limit capacity by package type
Limiting capacity by package makes it possible to enforce real-time storage capacity checks based on package type (e.g., crates, bins, boxes, etc.).
Click Add a line to add a package type to the storage category. Alternatively, create a new package type on the Inventory tab of the product form (in the Packaging section), or from the Product Packagings page.
Example
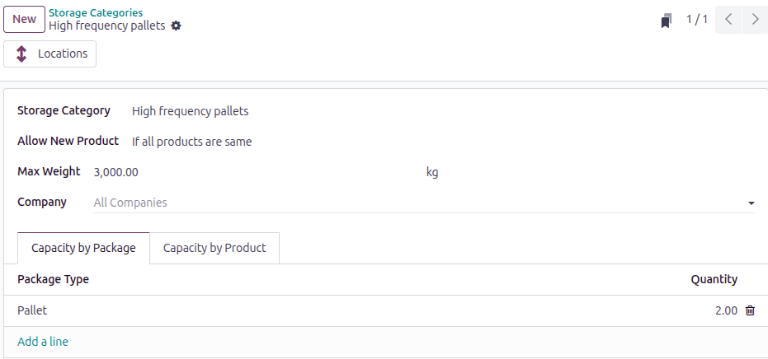
To help create putaway rules for pallet-stored items, create the High frequency pallets storage
category.
In the Capacity by Package tab, specify the number of packages for the designated
Package Type, and set a maximum of 2.00 Pallets for a specific location.
Important
Odoo does not automatically split quantities across multiple storage locations. If an incoming receipt contains several units or packages and the first recommended location exceeds its capacity, Odoo still routes all items to that same location instead of selecting another one with available space.
(Example: If a location can hold 10 units and 12 units arrive, all 12 are still assigned to that location.)
Assign storage locations
After the storage category is created, it can be assigned to the sublocations. Go to , and open the desired sublocation. Then, select the created category in the Storage Category field.
Example
Assign the High frequency pallets storage category (which limits pallets stored at any location
to two pallets) to the WH/Stock/Pallets/PAL1 sublocation.
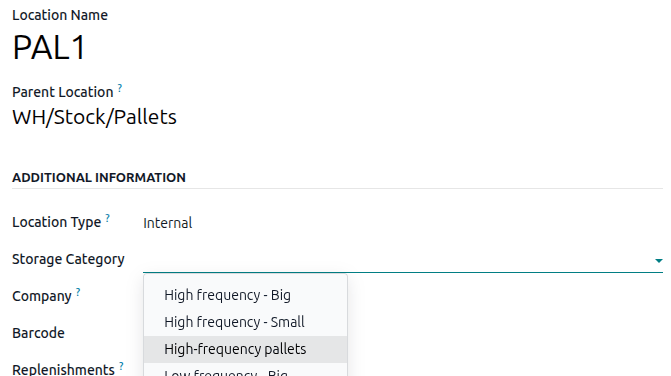
Repeat this step for all sublocations to which the storage category should apply.
Tip
On the storage category form, the Locations smart button shows which storage locations the category has been assigned to.
Create a putaway rule
With the storage category and locations set up, create the putaway rule by navigating to .
Click the New button to create the putaway rule. Specify a location in the Store to field.
Use the Sublocation field to specify that you want to use a storage category on the sublocations of the Store to field:
Last Used: The last location that had a move associated with it for that product or product category is used. If there is no last location used, the destination is whatever is specified in the Store to field.
Closest Location: The locations specified as part of the storage category are used. A storage category is mandatory in the Having Category field. The locations in the storage category must be sublocations of the location in the Store to field. If the closest locations in the storage category are full, the Store to location is used.
Example
Continuing the example from above, the High frequency pallets storage category is assigned to
the putaway rule directing pallets of lemonade to locations with the High frequency pallets
storage category assigned to them.

Note
If products are not routing to secondary locations for a storage category and a product weight is
defined, verify that the storage category’s Max Weight value is set to a number
greater than 0.
Use case: limit capacity by package
To limit the capacity of a storage location by a specific number of packages, create a storage category with a Capacity By Package.
Continuing the examples from above, the High frequency pallets storage category is assigned to the
PAL1 and PAL2 locations.
Then, putaway rules are set, so that any pallets received in
the warehouse are directed to be stored in PAL1 and PAL2 locations.
Depending on the number of pallets on-hand at each of the storage locations, when two pallets of lemonade cans is received, the following scenarios happen:
If
PAL1andPAL2are empty, the pallet is redirected toWH/Stock/Pallets/PAL1.If
PAL1is full, the pallet is redirected toWH/Stock/Pallets/PAL2.If
PAL1andPAL2are full, the pallet is redirected toWH/Stock/Pallets.If
PAL1is partially full (for example, with one pallet), Odoo treats more than one received pallet as a single pallet on the receipt. You must manually separate the two pallets into separate storage locations. Click the Details link to the right of the Units field, and then in the Detailed Operations box, click Add a line. Finally, split the receipt by quantity into separate locations, then click Save.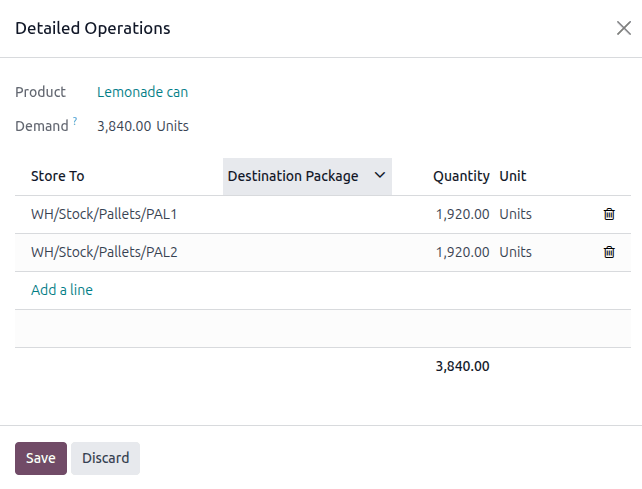
Adapted from the Odoo 19.0 User Documentation for DigitsCode customer support. © Odoo S.A. DigitsCode capabilities remain in the DigitsCode Capabilities category.