Inventory adjustments
Supply Chain · Inventory
Inventory adjustments
In any warehouse management system, the recorded inventory counts in the database might not always match the actual inventory counts in the warehouse. Discrepancy between counts can be due to damage, human error, theft, or other factors. As such, inventory adjustments must be made to reconcile the differences, and ensure that the recorded counts in the database match the actual counts in the warehouse.
Physical Inventory page
To view the Physical Inventory page, navigate to .
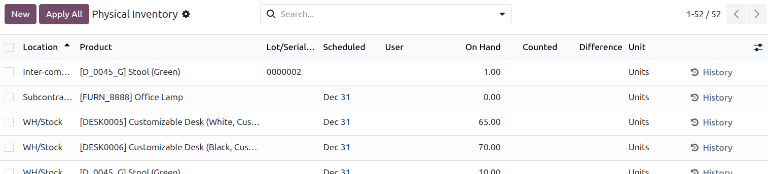
The Physical Inventory page lists all products that are currently in stock.
Note
Only products with a quantity greater than zero are listed on the Physical Inventory page. To view product lines with zero current quantity, go to .
For each product line, the following information is listed:
Product: the product whose quantity is listed on the inventory adjustment line.
Lot/Serial Number: the tracking identifier assigned to the specific product listed. It can contain letters, numbers, or a combination of both.
Note
If a specific product has a quantity of more than
1.00in stock, and more than one serial number, or lot number, assigned to it, each uniquely-identified product is displayed on its own product line with its own lot/serial number, displayed under the Lot/Serial Number column.Scheduled: the date at which a count should be made. If not otherwise specified, this date will default to the 31st of December of the current year.
User: the person assigned to the count in the database. This can either be the person physically counting the inventory, or applying the count in the database.
On Hand: the quantity of the product currently recorded in the database.
Counted: the real quantity counted during an inventory count. This field is left blank by default but can be changed, depending on if it matches the On Hand quantity or not.
Difference: the difference between the On Hand quantity and Counted quantity, once an inventory adjustment is made. The difference is automatically calculated after every inventory adjustment.
Tip
Some columns are hidden by default. To reveal these columns, click the (adjust) icon to the far right of the form’s top row, and reveal any desired column by selecting the checkbox next to that option.
The following additional columns are available, depending on the settings in the database:
Location: the specific location in the warehouse where a product is stored. This column is only visible if Storage Locations are enabled.
Product Category: the category of the product list on the inventory adjustment line.
Last Count Date: the last time the quantity was updated.
Expiration Date: the date on which the goods with this serial number are due to expire. This column is only available if Expiration Dates is enabled in the Inventory settings.
Package: the package containing the quantity listed.
Unit: the unit of measure in which the product is measured. Unless otherwise specified (e.g., in Pounds or Ounces), the default UoM is Units.
Create an inventory adjustment
To update an existing physical inventory entry, click into the corresponding field in the Counted column for the product that must be adjusted. Adjust the count, then click Apply All.
To create a new inventory adjustment from the page, click New. Doing so creates a new, blank inventory adjustment line at the bottom of the page.
Tip
Inventory adjustments can also be created from the Forecasted Report on an individual product record. To open the report, navigate to a product record and click the Forecasted smart button. Then, at the top of the page, click Update Quantity, then New.
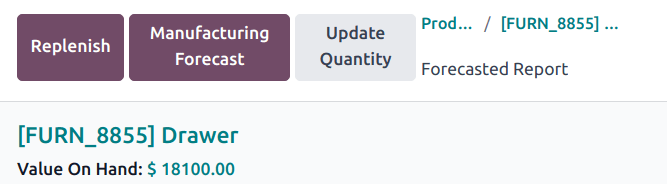
On this blank inventory adjustment line, click the drop-down menu under the Product column, and select a product. If the selected product is tracked using either lots or serial numbers, the desired lot or serial number must be chosen from the drop-down menu under the Lot/Serial Number column.
Tip
The inventory adjustment line can also be used to create or record lots and serial numbers.
Next, set the value in the Counted column to the quantity counted for that product during the inventory adjustment process.
The Scheduled date and User can also be changed via their respective drop-down menus. Changing the Scheduled date changes the date that the inventory adjustment should be processed on, and selecting a responsible User assigns a user to the specific inventory adjustment for traceability purposes.
Once all changes have been made to the new inventory adjustment line, click away from the line. Doing so saves the adjustment, and moves the line alphabetically with the other products in inventory.
If the Counted quantity is greater than the On Hand quantity, the value in
the Difference column is green. If the Counted quantity is less than the
On Hand quantity, the value in the Difference column is red with a
negative value. If the quantities match, and have not been changed at all, 0.00 appears in the
Difference column.

At this stage, the count (inventory adjustment) is recorded, but not yet applied. This means that the quantity on hand before the adjustment has not yet been updated to match the new, real counted quantity.
Apply adjusted count
Inventory adjustments can be completed in three ways.
Apply a single adjustment
Some companies do not require adjustment reasons to be recorded. In this circumstance, you can apply adjustments to a single line at a time by clicking the Apply button on the line at the far right of the page.
Apply multiple adjustments
To apply multiple adjustments at once, or to ensure that reasons for adjustments are recorded, use one of the following methods to apply multiple adjustments at once:
Click the Apply All button on the top left corner of the page.
Select the checkbox on the far left of the line. Doing so reveals new button options at the top of the page, one of which is an Apply button.
Note
It may be necessary to click the Save button at the top left of the screen before applying the changes.
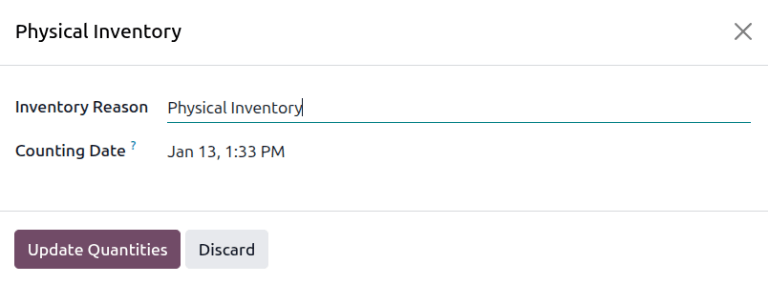
Clicking these buttons opens a Physical Inventory pop-up window.
In the Physical Inventory window, a reference or reason can be assigned to the inventory
adjustment. By default, the Inventory Reason field is pre-populated with Physical
Inventory. Modify this text as necessary. Today’s date is populated in the Counting
Date field. Once ready, click Update Quantities to apply the inventory adjustment.
Example
An FDA-regulated factory is required by law to trace, log, and explain all inventory adjustments to ensure that it remains in compliance with federal law. Any product stock moves and associated reasonings would need to be documented thoroughly to ensure that all product is accounted for in case of a recall.
Note
Applying an inventory adjustment simultaneously creates a stock move record in the Moves History report for traceability.
Relocate products
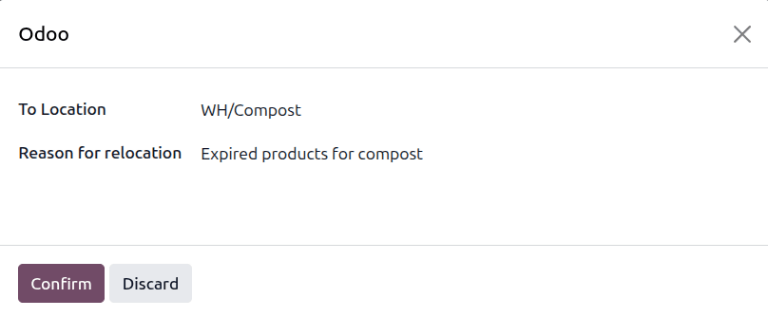
Inventory adjustments can also be used to relocate products to different storage locations, or to different packages. To relocate a product, click on the checkbox at the far left of the line for the desired product. At the top of the page, click the Actions button, then select Relocate. Doing so opens a pop-up.
On the resulting pop-up, enter the following information:
To Location: the new location for the products.
To Package: the new package for the products. This field only appears if you have Packages enabled in the Inventory settings.
Reason for relocation: the reason for the move.
Click Confirm to confirm the move.
Important
Product relocations only work on internal locations. Products cannot be moved between companies.
Only users with Administrator rights can perform product relocations.
Set to zero
Inventory adjustments can also be used to clear inventory counts by setting the quantity to zero. To do this, select the checkbox at the far left of the line for the desired product. At the top of the page, click the Actions button to open a drop-down menu. Click Set to 0. Once this is complete, apply the adjusted count.
Important
Setting the quantity to zero for a product that has already been reserved for sales orders will set the forecasted quantity to negative. The product will be marked as unavailable for current delivery orders.
Count products
Counting products is a recurring activity in a warehouse. Once a count is complete, go to to update the Counted quantity for each product line.
On each product line, identify whether the value in the On Hand column recorded in the database matches the newly-counted value. If the recorded value and the counted value match, enter the ‘On Hand’ quantity in the Counted column.
Doing so sets the value of the Difference column to 0.00. Subsequently, once applied,
an inventory move with 0.00 Done is recorded in the product’s inventory adjustment
history.

If the newly-counted value for a given product does not match the value in the On Hand column recorded in the database, record the real value in the field in the Counted column.
To do so, click the field in the Counted column on the specific inventory adjustment line for the product whose count is being changed. Specify the updated count in the field.
To change this value, type in a new value that matches the real, newly-counted value. Then, click away from the line. Doing so saves the adjustment, and automatically adjusts the value in the Difference column.
If the Counted quantity is greater than the On Hand quantity, the value in
the Difference column is green. If the Counted quantity is less than the
On Hand quantity, the value in the Difference column is red and is a
negative value. If the quantities match, and have not been changed at all, 0.00 appears in the
Difference column.
Subsequently, once applied, a move with the difference between the On Hand quantity and the Counted quantity is recorded in the product’s inventory adjustment history.

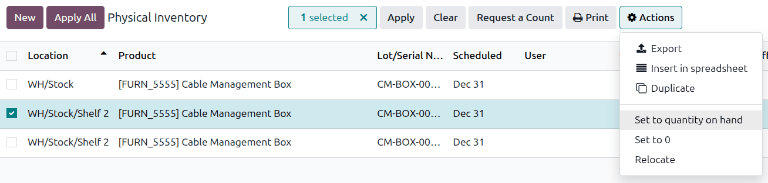
The Actions menu appears when one or more products’ checkboxes are selected. The Actions menu includes the option to Set to quantity on hand, which sets the selected products’ Counted quantity to the On Hand quantity.
Note
If other inventory adjustments were created during the count process, click Save in the top-left corner to save the current entry. Make sure this is done before opening the Actions menu to set the count.
Important
Sometimes a count occurs, but cannot be applied in the database right away. In the time between the actual count and applying the inventory adjustment, product moves can occur. In that case, the on-hand quantity in the database can change and no longer be consistent with the counted quantity. As an extra precaution, Odoo asks for confirmation before applying the inventory adjustment.
Revert an inventory adjustment
To revert the changes made in an inventory adjustment, navigate to .
Select the checkbox at the far left of the line for the desired product. At the top of the page, click the Actions button to open a drop-down menu, and click Revert Inventory Adjustment.
Note
After an inventory adjustment is reverted, the line is not removed from the Moves
History report. Instead, an additional line is added, this time with the word [reverted] added
to the Reference column.

Change inventory count frequency
By default, the scheduled date for inventory adjustments are always scheduled for the 31st of December of the current year. However, for some companies, it is crucial that they have an accurate inventory count at all times. In such cases, the default scheduled date can be modified.
To modify the default scheduled date, go to . Then, in the Operations section, locate the Annual Inventory Day
and Month setting, which includes a drop-down menu that is set to 31 December by default.
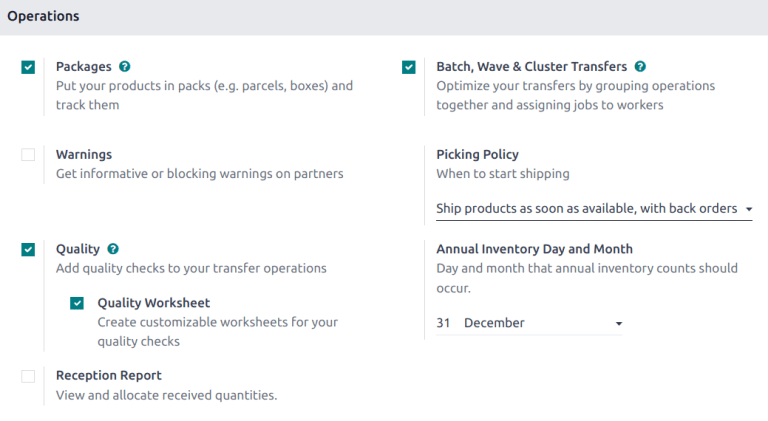
To change the day, click the 31, enter a number from 1-31, depending on the desired month of the
year.
Then, to change the month, click December to reveal the drop-down menu, and select the desired month.
Once all desired changes have been made, click Save to save all changes.
Plan big inventory counts
To plan big inventory counts, such as a full count of everything currently in stock, first navigate to .
Then, select the desired products to be counted by ticking the checkbox on the far left of each product line.
Tip
To request a count of all products currently in stock, select the checkbox at the top of the table, in the header row next to the Location label. This selects all product lines.
Once all desired products have been selected, click the Request a Count button at the top of the page. Doing so opens the Inventory Request pop-up window, where the following information can be filled:
Assign to: the user responsible for the count.
Scheduled at: the planned date of the count.
Show Expected Quantity: whether the assigned user can see the expected quantity.
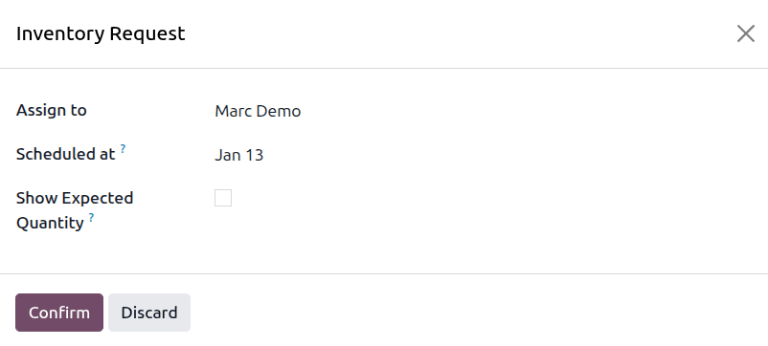
Finally, once ready, click Confirm to request the count.
Important
In the Odoo Barcode app, users can only view inventory counts that are assigned to them, and are scheduled for today or earlier.
Sometimes a count occurs, but cannot be applied in the database right away. In the time between the actual count and applying the inventory adjustment, product moves can occur. In that case, the on-hand quantity in the database can change and no longer be consistent with the counted quantity. As an extra precaution, Odoo asks for confirmation before applying the inventory adjustment.
Adjustment history
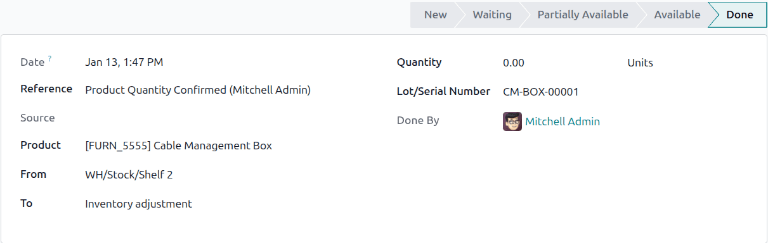
Details regarding inventory adjustment can be viewed by clicking the History icon.
The user who performed the count is listed in parenthesis in the Reference field, while the user who applied the count is listed in the Done By.
Inventory audit
An inventory audit can be accessed from the Physical Inventory page. This audit includes an inventory record both before and after a count is completed, to track what changed.
On the Physical Inventory page, select the checkbox at the top-left of the page to select all of the lines. Then click the Request a Count button. On the pop-up, click Confirm.
After returning to the Physical Inventory page, select all of the lines again. Click . The Count Sheet exports in PDF form.
See also
Adapted from the Odoo 19.0 User Documentation for DigitsCode customer support. © Odoo S.A. DigitsCode capabilities remain in the DigitsCode Capabilities category.