Generate leads from events
Marketing · Events
Generate leads from events
Odoo Events allows users to generate leads from their event attendees based on customizable criteria. Leads can be generated manually, or automatically by configuring lead generation rules.
View lead generation rules
To view the lead generation rules for an event, navigate to .
The Lead Generation Rule page displays any previously configured rules in a standard list view with each rule’s Rule Name, Lead Creation Type, When it is triggered, its associated Event Templates, the Event it is applied to, and its related Company (if applicable).
Create a lead generation rule
On the Lead Generation Rule dashboard, click New to open a new Lead Generation Rule form.
Start by entering a Rule Name.
In the Create field, select one of the following options to specify the lead creation type:
Per Attendee: Create a single lead for each attendee.
Per Order: Create a single lead for each ticket sale.
In the When field, select one of the following options to specify when the rule is triggered:
Attendees are created: Create a lead when an attendee record for an event is created.
Attendees are registered: Create a lead when an attendee registers for an event.
Attendees attended: Create a lead when an attendee’s attendance is confirmed and the registration stage is set to Done.
Event-specific filters
In the For Any Of These Events section of the form, configure the following options to restrict the rule to the following criteria:
Event Templates: Trigger the rule only for events of the specified event template/category.
Company: Trigger the rule only for events belonging to the specified company (if working in a multi-company environment).
Event: Trigger the rule only for the specified event.
Attendee-specific filters
In the If The Attendees Meet These Conditions section of the form, restrict the rule to attendees fulfilling specific criteria.
By default, this field is set to Match all records of attendees in the database.
To add specific criteria, click the Add condition button. Alternatively, click the (right arrow) icon, then click New Rule.
Doing so adds a new custom filter rule. Users can select a field name to filter by and choose a conditional operator to compare the value to the chosen field. If needed, users can also add a group of nested conditions that depend on the parent rule by clicking (Add branch). For any group of conditions, users can toggle between matching all of the conditions in the group or any of the conditions.
The number of filtered attendee records is displayed at the bottom of the section. Click # record(s) to view the list of attendees that match the filter rule.
Lead default values
In the Lead Default Values section, assign default values to new leads generated from this rule.
First, in the Lead Type field, specify whether this rule creates a Lead or an Opportunity.
Note
The Lead Type field only appears if the CRM app is installed and leads are enabled. To do so, navigate to , then enable the Leads feature.
In the Sales Team field, select a specific sales team in the database to which newly created leads are automatically assigned. Similarly, specify a Salesperson to which the leads are automatically assigned.
Finally, in the Tags field, add one or more tags to the created leads generated from the rule to organize and distinguish leads by specific identifiers/categories.
Example
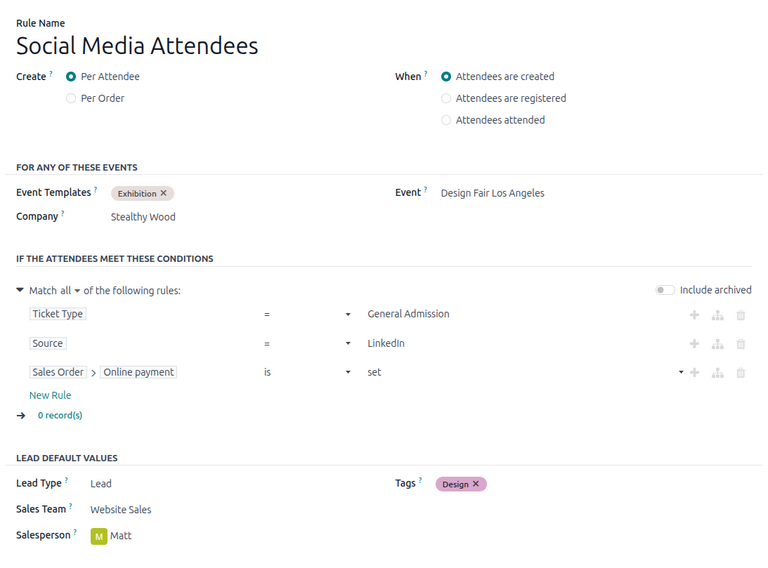
A company called Stealthy Wood wants to generate leads for every attendee who bought a General Admission ticket to their Design Fair Los Angeles event by clicking a link for tickets from a social media post on LinkedIn, then purchasing the ticket online. Additionally, any new leads generated should be automatically assigned to their dedicated Website Sales team.
To generate these leads, they create a rule called Social Media Attendees. Then, they select
Per Attendee in the Create field and Attendees are created in
the When field to trigger the rule every time a new attendee is created.
In the For Any Of These Events section, they select Exhibition as the event category in the Event Templates field. Next, they select Stealthy Wood as the Company the event is associated with. They also select Design Fair Los Angeles as the specific Event the rule should generate leads for.
In the If The Attendees Meet These Conditions section, they click the Add condition button to reveal a new, modifiable condition line.
Next, they click the first field and select Ticket Type from the popover. In the
second field, they select =. In the third field, they select the General Admission
ticket type.
Because the company wants to be even more specific about attendees who purchased a General Admission ticket, they add two more condition lines by clicking New Rule or (Add New Rule).
In the second condition line, they select Source in the first field, choose = in
the second field, and add the corresponding LinkedIn social media outlet options in
the third field.
In the final condition line, they select Sales Order Online payment in the first field. Then, they select is in the second field and set in the third field.
Finally, in the Lead Default Values section, they assign these leads to their Website Sales team in the Sales Team field. They also add Matt as the lead Salesperson responsible for managing the leads. Finally, for organization purposes, they add a Design tag in the Tags field.
Generate leads
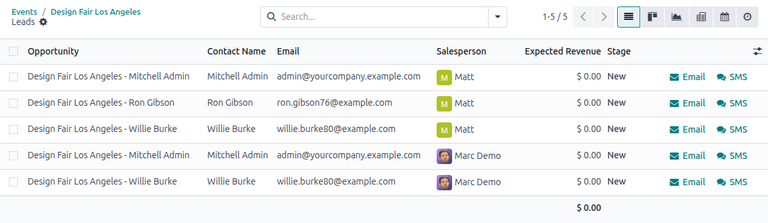
Leads are automatically generated for applicable events whenever a rule is satisfied. To view generated leads, open the Events app and select the targeted event. A Leads smart button appears at the top of the chosen event form, displaying the number of leads generated for this event.
Click the Leads smart button to open a dashboard of generated leads. By default, the dashboard opens in a (List) view displaying each lead’s title, associated attendee’s contact details, assigned salesperson, the expected revenue and stage of the lead, and the option to either Email or send an SMS to the lead.
Leads can also be viewed in the (Kanban), (Graph), (Pivot), (Calendar), and (Activity) views. The search bar’s drop-down menu allows users to filter or group records by specific criteria in each view.
Manually generate leads
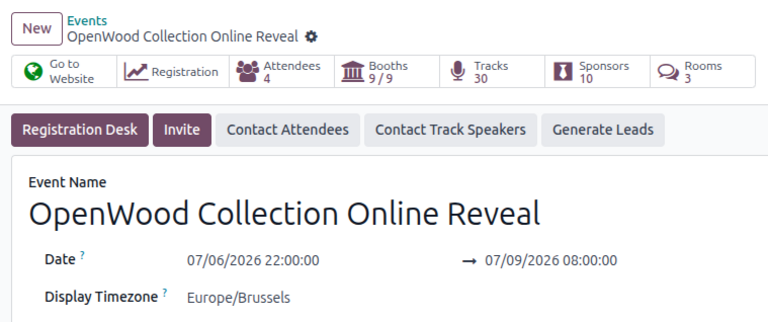
Leads can also be manually generated from an event form by clicking the Generate Leads button. This allows users to generate (or re-generate) leads as needed (e.g., after modifying a rule) without duplicating existing leads.
See also
Adapted from the Odoo 19.0 User Documentation for DigitsCode customer support. © Odoo S.A. DigitsCode capabilities remain in the DigitsCode Capabilities category.