Shop Floor overview
Supply Chain · Manufacturing
Shop Floor overview
The Shop Floor module is a companion module to the Manufacturing app. Shop Floor provides a visual interface for processing manufacturing orders (MOs) and work orders. It also allows manufacturing employees to track the amount of time spent working on manufacturing and work orders.
The Shop Floor module is installed alongside the Manufacturing app.
Access Shop Floor
Shop Floor can be opened in the following ways:
Click the Shop Floor module icon from the main Odoo dashboard.
Click the Shop Floor smart button on a manufacturing order. This will open the manufacturing order in the Shop Floor module.
Activating work centers
When Shop Floor is opened on a workstation, it is possible to select work centers to assign to it.
Open the Shop Floor app from either the main Odoo dashboard or from the Shop Floor smart button on a manufacturing order.
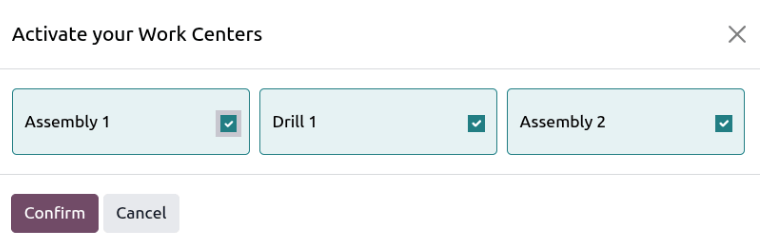
If it is the workstation’s first time opening Shop Floor, click the Activate your Work Centers button that appears, and an Activate your Work Centers pop-up window loads.
Select the work centers to assign to the workstation by clicking the respective checkboxes, then click Confirm.
Installing Shop Floor on a workstation
Shop Floor can be installed in the Chrome browser of a workstation to limit its access to other Odoo applications.
First, open the Shop Floor app from either the main Odoo dashboard or from the Shop Floor smart button on a manufacturing order.
Click the (menu) icon, then click Install App. A new window will open. Click the Install button to install the app in the workstation’s browser.
Overview view
By default, the Overview is displayed when opening Shop Floor. This shows an information card for every MO that is ready to start. An MO is considered ready to start once it has been confirmed, and all required components are available.
To view every confirmed MO regardless of readiness, click the (remove) icon on the MO Ready filter to remove it from the Search bar.
MO information card
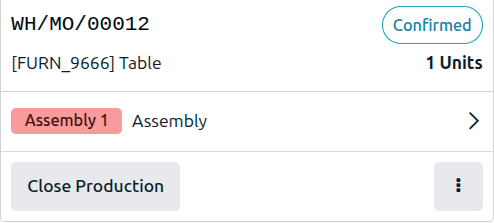
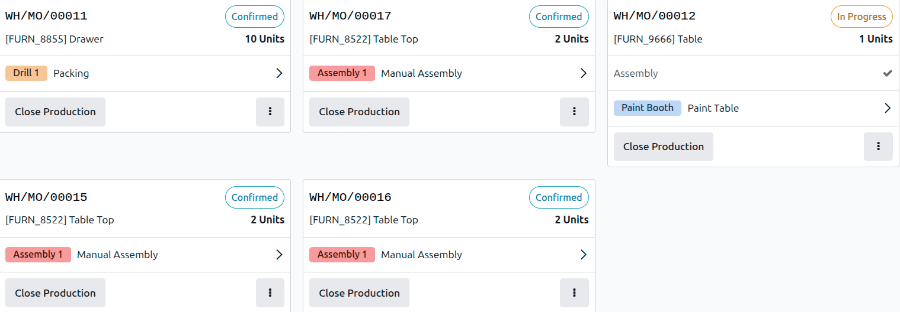
Each MO information card on the Overview displays all of the relevant details of the associated MO, and also provides employees with options for processing the MO.
The header for an MO card shows the MO number, the product and number of units being produced, and the MO status. If work on the MO has not yet begun, the status is Confirmed. When work has begun, the status updates to In Progress.
The main body of an MO card shows a line for each completed work order, if any, followed by the current work order to be completed. Completed work orders appear in grey with a (checkmark) icon next to it. The current work order is indicated by a (right chevron) button that opens the view for the work center to which the order is assigned.
If a lot or serial number is required for the product, below the current work order is a line titled Register Production, which records lot or serial numbers for the units produced. Click the Register Production line to specify a lot or serial number for the produced units, then click Validate.
The footer of the MO card displays a Close Production button. This is used to close the MO once production is completed. However, if any quality checks are required for the MO as a whole (not the work orders within it), a Quality Checks button appears instead. Clicking Quality Checks opens a pop-up window where any required quality checks can be completed.
After clicking Close Production, the MO card disappears and the work order is closed.
On the right side of the footer is a (vertical ellipsis) button, which opens an Options pop-up window with additional options for the MO:
Register Production / Serial: Record lots of serial numbers for the units produced.
Scrap: Send components to a scrap location when they are found to be defective. Learn more about the scrap order form in Scrap from stock.
Add Work Order: Add an additional work order to the MO. Specify the operation after which the work order should be inserted, a title, the work center at which it should take place, and the expected duration. Optionally assign a start date and the employee who should complete it.
Add Component: Add an additional component to the MO. Select products to add to the work order, then click the Back to ShopFloor button.
Note
Additional components are consumed in the Shop Floor module, but their stock moves will not be validated until the MO is closed.
Add By-product: Add a product that will be created as a byproduct of this work order. This displays when the By-Products setting is enabled in the Manufacturing app.
Open Manufacturing Order: opens the MO in the Manufacturing app.
Log Note: Enter a note that will be visible in the Shop Floor module and throughout all steps on the shop floor.
Work center views
The work center views list a number next to them. This number is the quantity of work orders currently ready to start in the work center. A work order is considered ready to start when the MO it is a part of is ready to start, and any preceding work orders have been completed.
By default, the view for each work center shows an information card for every work order assigned to it that is ready to start.
To view every confirmed work order assigned to a work center regardless of readiness, click the (remove) icon on the MO Ready filter to remove it from the search bar.
Managing work centers
Work center views can be toggled on or off by clicking the Add icon in the navigation bar, selecting or deselecting them on the pop-up window that appears, and then clicking Confirm.
Work order information card
The work order information cards on a work center’s view show all of the relevant details of the associated work order and also provide employees with options for processing it.
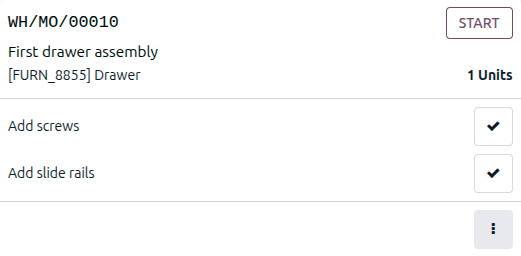
The header for a work order card shows the reference number of the MO that the work order is a part of, the product and number of units being produced. Click the Start button to start work on a work order. When work has begun, the status updates to display a timer showing the total time the work order has been worked on. The instructions for each work order open automatically when the timer starts.
The main body of a work order card shows a line for each step required to complete the work order. Work order steps can be completed by clicking the button for the line, then following the instructions on the pop-up window that appears.
If the work order being processed is the final work order for the MO, a Close Production button appears on the footer of the work order card. Clicking Close Production closes both the work order and the MO, unless a quality check is required for the Production` button appears on the footer of the work order card. Click the Close Production to close both the work order and the MO, unless a quality check is required for the MO. In this case, the quality check must be completed from the MO card before the MO can be closed.
Alternatively, if the MO requires the completion of additional work orders, a Mark as Done button appears instead. Clicking Mark as Done marks the current work order as completed, and causes the next work order to appear on the view for the work center it is assigned Done` button appears instead. Click Mark as Done to mark the current work order as completed, and the next work order appears on the view for the work center it is assigned to.
After clicking Close Production or Mark as Done, the work order card fades away. When the work order card disappears completely, the work order is marked as Finished on the MO.
On the right side of the footer is a (vertical ellipsis) button, which opens a pop-up window with additional options for the work order:
Register Production/Serial: Record a lot or serial numbers for the units produced.
Scrap: Send components to a scrap location when they are found to be defective. Learn more about the scrap order form in Scrap from stock.
Modify Routing: Move the work order to another work center or add another work order.
Add Component: Adds an additional component to the MO.
Open Manufacturing Order: Open the associated MO in the Manufacturing app.
Update instructions: Propose a change to the work order’s instructions or steps.
Create a Quality Alert: Open a quality alert form that can be filled out to alert a quality team about a potential issue.
Request Maintenance: Create a maintenance request for the work center.
Block: Stop all work on the immediate operation and block future work orders from being started until the work order is unblocked.
Operator panel
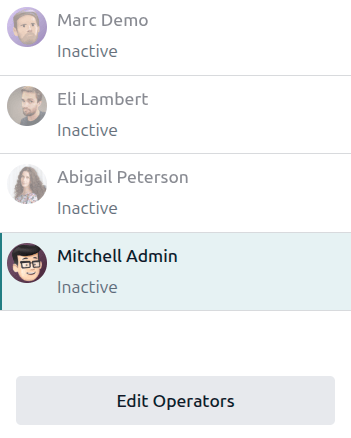
The operator panel is used to manage the employees who are signed in to the Shop Floor module. The panel displays the name and profile picture of every employee currently signed in across all database instances.
To interact with Shop Floor as a specific employee, click the employee’s name to activate their profile. Inactive profiles appear with their names and profile pictures greyed out.
When an employee is selected in the operator panel, they can begin working on a work order by clicking the work order’s heading. If an employee is working on one or more work orders, the work order titles appear under their name, as well as a timer showing how long they’ve been working on each order.
To add new employees to the operator panel, click the Edit Operators button at the bottom of the panel. Then, select employees from the Edit Operators pop-up window. Click Done to save the list of operators.
To remove an employee from the operator panel, click the Edit Operators button, deselect the employee, then click Done.
MO/WO prioritization
The Shop Floor module prioritizes orders based on their scheduled date, set in the MO. An order can be moved to the top of the list by clicking the (star) icon in the MO form. MOs and work orders scheduled sooner are more highly prioritized and appear before orders which are scheduled further out.
To specify the scheduled date on an MO, begin by navigating to , and click New to create a new MO.
To learn more about the fields on the MO form, see Create manufacturing order.
Click on the Scheduled Date field to open a calendar popover window. By default, the Scheduled Date field and its corresponding pop-up window show the current date and time.
Use the calendar to select the date on which processing should begin for the MO. In the two fields at the bottom of the popover window, enter the hour and minute at which processing should begin, using the 24-hour clock format.
Finally, click Apply at the bottom of the popover window to set the date and time for the Scheduled Date field. Then, click the Confirm button at the top of the MO to confirm it.
Once the MO is confirmed, it appears in the Shop Floor module, as long is it has the Ready status, which means all components are available.
On the Odoo dashboard, click on the module to open it. The Overview of the dashboard displays Ready MOs, organized in order of priority on their MO form, then their scheduled dates.
Example
Three MOs are confirmed for a Table product:
WH/MO/00018 has a Scheduled Date of March 31.
WH/MO/00019 has a Scheduled Date of April 9.
WH/MO/00020 has a Scheduled Date of April 3.
On the Overview of the Shop Floor module, the cards for each MO appear in this order: WH/MO/00018, WH/MO/00020, WH/MO/00019.

Each MO requires one work order, carried out at Assembly 1. Clicking on the Assembly 1 button at the top of the screen opens the view for the work center, which displays one card for each work order, appearing in the same order as their corresponding MOs.
Adapted from the Odoo 19.0 User Documentation for DigitsCode customer support. © Odoo S.A. DigitsCode capabilities remain in the DigitsCode Capabilities category.